

This page describes the high-level steps required to set up W&B Launch so that you can submit machine learning jobs to your own compute infrastructure (such as Kubernetes, Amazon SageMaker, or Vertex AI) directly from W&B. Setting up Launch enables your team to share compute resources, queue jobs, and reproduce runs across environments. To set up Launch, you must complete the following:Documentation Index
Fetch the complete documentation index at: https://wb-21fd5541-style-guide-support-models-articles-20260527-00.mintlify.app/llms.txt
Use this file to discover all available pages before exploring further.
- Set up a queue: Queues are first-in, first-out (FIFO) and possess a queue configuration. A queue’s configuration controls where and how jobs run on a target resource.
- Set up an agent: Agents run on your machine or infrastructure and poll one or more queues for launch jobs. When the agent pulls a job, it ensures that the image is built and available. The agent then submits the job to the target resource.
Set up a queue
Configure launch queues to point to a specific target resource along with any additional configuration specific to that resource. For example, a launch queue that points to a Kubernetes cluster might include environment variables or set a custom namespace in its launch queue configuration. When you create a queue, you specify both the target resource you want to use and the configuration for that resource to use. When an agent receives a job from a queue, it also receives the queue configuration. When the agent submits the job to the target resource, it includes the queue configuration along with any overrides from the job itself. For example, you can use a job configuration to specify the Amazon SageMaker instance type for that job instance only. In this case, it’s common to use queue config templates as the end user interface.Create a queue
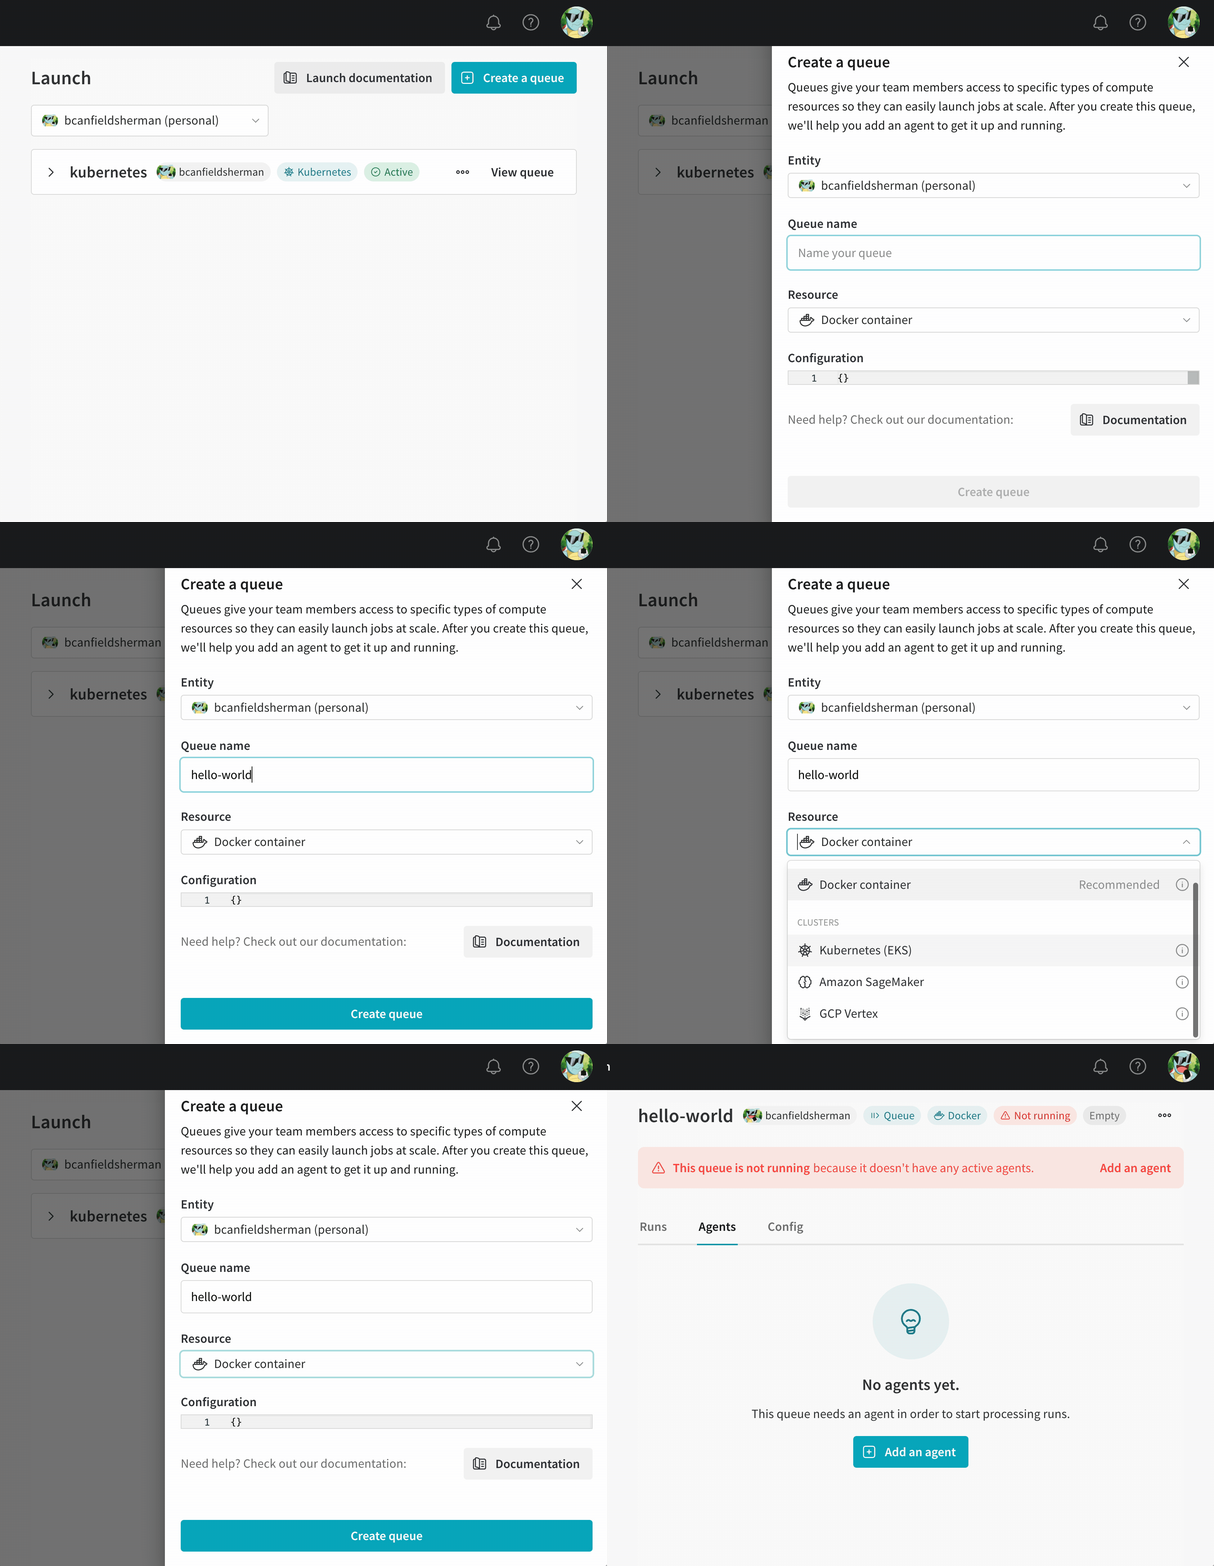
Create a queue to define where launch jobs run and how they’re configured. To create a queue:- Navigate to Launch App at wandb.ai/launch.
- Click the create queue button on the top right of the screen.
- From the Entity dropdown menu, select the entity the queue belongs to.
- Provide a name for your queue in the Queue field.
- From the Resource dropdown, select the compute resource you want jobs added to this queue to use.
- Choose whether to allow Prioritization for this queue. If prioritization is enabled, a user on your team can define a priority for their launch job when they enqueue it. Higher priority jobs run before lower priority jobs.
- Provide a resource configuration in either JSON or YAML format in the Configuration field. The structure and semantics of your configuration document depend on the resource type that the queue points to. For more details, see the dedicated set up page for your target resource.
Set up a launch agent
Launch agents are long-running processes that poll one or more launch queues for jobs. Launch agents dequeue jobs in FIFO order or in priority order depending on the queues they pull from. When an agent dequeues a job from a queue, it optionally builds an image for that job. The agent then submits the job to the target resource along with configuration options specified in the queue configuration.Agents are flexible and can be configured to support many use cases. The required configuration for your agent depends on your specific use case. See the dedicated page for Docker, Amazon SageMaker, Kubernetes, or Vertex AI.
W&B recommends you start agents with a service account’s API key, rather than a specific user’s API key. Using a service account’s API key has two benefits:
- The agent isn’t dependent on an individual user.
- Launch views the author associated with a run created through Launch as the user who submitted the launch job, rather than the user associated with the agent.
Agent configuration
Configure the launch agent so it knows which queues to poll, which entity to operate under, and how many jobs to run in parallel. Configure the launch agent with a YAML file namedlaunch-config.yaml. By default, W&B checks for the config file in ~/.config/wandb/launch-config.yaml. You can optionally specify a different directory when you activate the launch agent.
The contents of your launch agent’s configuration file depend on your launch agent’s environment, the launch queue’s target resource, Docker builder requirements, cloud registry requirements, and so forth.
Independent of your use case, the launch agent has the following core configurable options:
max_jobs: Maximum number of jobs the agent can execute in parallel.entity: The entity that the queue belongs to.queues: The name of one or more queues for the agent to watch.
You can use the W&B CLI to specify universal configurable options for the launch agent (instead of the config YAML file): maximum number of jobs, W&B entity, and launch queues. See the
wandb launch-agent command for more information.[ENTITY-NAME] with your W&B entity, and replace [QUEUE-NAME] with the name of a queue for the agent to poll.
launch-config.yaml
Configure a container builder
You can configure the launch agent to build images. You must configure the agent to use a container builder if you intend to use launch jobs created from git repositories or code artifacts. See Create a launch job for more information on how to create a launch job. W&B Launch supports three builder options:- Docker: The Docker builder uses a local Docker daemon to build images.
- Kaniko: Kaniko is a Google project that enables image building in environments where a Docker daemon is unavailable.
- Noop: The agent doesn’t try to build jobs, and instead only pulls pre-built images.
Use the Kaniko builder if your agent is polling in an environment where a Docker daemon is unavailable (for example, a Kubernetes cluster).See Set up Kubernetes for details about the Kaniko builder.
launch-config.yaml) that specifies to use Docker or Kaniko:
launch-config.yaml
Configure a container registry
Sometimes, you might want to connect a launch agent to a cloud registry so it can pull pre-built images or push images it builds. Common scenarios for connecting a launch agent to a cloud registry include:- You want to run a job in an environment other than where you built it, such as a powerful workstation or cluster.
- You want to use the agent to build images and run these images on Amazon SageMaker or Vertex AI.
- You want the launch agent to provide credentials to pull from an image repository.
Activate the launch agent
After you configure the agent, activate it so that it starts polling the queues you specified and dispatching jobs to your target resource. Activate the launch agent with thelaunch-agent W&B CLI command. Replace [QUEUE-1] and [QUEUE-2] with the names of queues for the agent to poll: